Pay online

![]() and how to use it...
and how to use it...
Connecting To A Server:
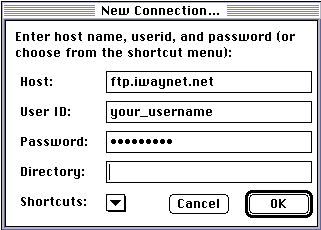
When you start the Fetch application, by default it opens with the "New Connection" window (as shown below).
- Select your "Shortcut" and verify the information is entered
properly, otherwise enter the proper information in the fields.
Host = name of server
User ID = your user name
Password =your password. - Click on the "OK" button and the program will attempt to connect you to the server. NOTE: A "User ID" and "Password" is normally required.
Creating A New Shortcut:
You should create your own shortcut if you will be connecting to a certain server occasionally so that you do not manually type in the information every time you connect. This is just a convenience and is not required.
- Click on the "Customize" menu and select "New Shortcut".
- In the "Bookmark Editor" window, type in the name you would like to save the shortcut as in the "Name" box.
- In the "Host" box, type in the name of the server you will be connecting to.
- In the "User ID" box, type in the username required for connecting to the server. NOTE: Most servers allow anonymous access, whereby you could just type in "anonymous" and then type your Email address in the "Password" box.
- Click on the "OK" button to create the shortcut.
When You Are Connected:
When you are connected to the server, you will see a new window with the name of the server you connected to. In this window you will see the different files and folders you have in your directory.
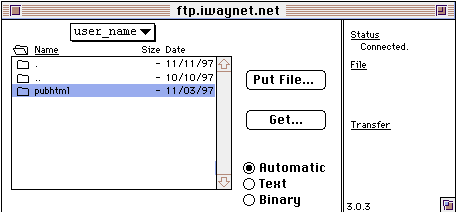
You can navigate through the folders in the Fetch window by double-clicking the mouse on the folder names (folders have little folder images to the left of them).
To transfer a file from your computer to the server you can click on the "Put File..." button or drag the file from your desktop/hard drive to the Fetch window. If you would like to upload more than one file at a time, you can click on the "Remote" menu and select "Put Folders and Files". In the new window navigate through your hard drive and add files that you want to transfer to the "Files and Folders to upload" box by selecting the file and clicking on the "Add" button. When you are finished click on the "Done" button to begin the transfer.
To transfer a file from the server to your computer you can select the file in the Fetch window and click on the "Get File" button. You will see a new window prompting you to tell the program where to save the file, and it also gives you the chance to rename the file when saving it. Most persons will save files to the Macintosh desktop. You can do this by clicking on the "Desktop" button and then click on "Save" when you are ready to download the file. If you would like to download more than one file at a time, you can select multiple files by holding down the Command Key (usually next to the space bar, on either side) and selecting the files you want to download. Note: If you want to select a list of files that are in sequence, you can click on the first file and then hold down the SHIFT key and click on the last file. When you have chosen the files for downloading, click on the "Get File" button and follow the same download process as above.
NOTE: A common problem that users face when uploading binary files is that Fetch (by default) is configured to upload files in Mac Binary format. For persons uploading Web Page files (pictures, sounds, movies, etc.) it is necessary to specifically choose Raw-Data as the binary transfer mode. This will ensure that the files can be used properly for a web page.
Support: support@iwaynet.net